- Published on
使用 Vue.js 构建 OAuth2 授权同意页面
- Authors
- Name
- ReLive27
在之前的文章中曾介绍过【自定义OAuth2授权同意页面】,不过在实际应用中和前后端分离项目中使用模版引擎方式构建授权同意页面就过于局限。在这篇文章中,我们将探讨如何使用 Vue.js 构建 OAuth2 授权同意页面,实现前后端分离的授权流程。我们将使用 Spring Authorization Server 构建 OAuth2 授权服务器,Spring Security 构建 OAuth2 客户端。
创建 Vue.js 项目
我们将使用vue-admin-template快速构建简单的 Vue 项目。
配置路由
修改src目录下router.js文件,用于配置路由:
import Vue from 'vue'
import Router from 'vue-router'
import Layout from '@/layout'

Vue.use(Router)

export const constantRoutes = [
    {
      path: '/oauth2/authorize',
      component: () => import('@/views/oauth2/index'),
      hidden: true
    },

    {
      path: '/oauth2/callback',
      name: 'OAuth2Callback',
      component: () => import('@/views/oauth2/callback')
    }
]
创建授权同意页面
在src/views/oauth2目录下创建一个index.vue文件:
<template>
  <div class="consent-container">
    <div style="width: 45%; height: 50%; margin: 100px auto">
      <h3 style="text-align: center"><b>{{ principalName }}</b> wants the following permission</h3>
      <div class="form-container">
        <el-form ref="consentForm" :model="consentForm" class="consent-form" auto-complete="on" label-position="left">
          <el-input
            ref="client_id"
            v-model="consentForm.client_id"
            name="client_id"
            type="hidden"
          />
          <el-input
            ref="state"
            v-model="consentForm.state"
            name="state"
            type="hidden"
          />
          <el-form-item>
            <el-checkbox-group v-model="checkScopes">
              <el-checkbox v-for="scope in scopes" :key="scope" :disabled="scope.disabled" :label="scope.scope">{{ scope.description }}</el-checkbox>
            </el-checkbox-group>
          </el-form-item>
          <hr>

          <el-button :loading="loading" type="info" style="width: 48%;" @click.native.prevent="cancelConsent">Cancel
          </el-button>
          <el-button :loading="loading" type="primary" style="width: 48%; float: right" @click.native.prevent="handleConsent">
            Authorize thepracticaldev
          </el-button>

          <div style="margin-top: 5px;width: 100%;height: 50px">
            <p style="text-align: center;font-size: 14px">Authorization will redirect to</p>
            <p style="text-align: center;font-size: 14px"><b>{{ redirectUri }}</b></p>
          </div>
        </el-form>
      </div>
    </div>
  </div>
</template>
处理 OAuth2 授权请求
在Vue.js应用中,使用axios发送HTTP请求处理OAuth2授权请求。在需要授权的组件中,发送一个GET请求获取授权信息,然后根据用户的选择发送同意或拒绝的POST请求。
<script>
import { authorizeConsent, oauth2Authorize } from '@/api/user'
export default {
  data() {
    return {
      consentForm: {
        client_id: '',
        state: ''
      },
      checkScopes: [],
      principalName: '',
      redirectUri: '',
      scopes: [],
      loading: false
    }
  },

  mounted() {
    this.oauth2Authorize()
  },

  methods: {
    cancelConsent() {
      this.checkScopes = []
      this.handleConsent()
    },

    handleConsent() {
      this.loading = true
      authorizeConsent(Object.assign({}, this.consentForm, { scope: this.checkScopes })).then(response => {
        if (response.code === 302) {
          location.href = response.data
        }
        this.loading = false
      }).catch(() => {
        this.loading = false
      })
    },

    oauth2Authorize() {
      const requestParams = {
        response_type: this.$route.query.response_type,
        client_id: this.$route.query.client_id,
        scope: this.$route.query.scope,
        state: this.$route.query.state,
        redirect_uri: this.$route.query.redirect_uri,
        nonce: this.$route.query.nonce
      }
      oauth2Authorize(requestParams).then(response => {
        if (response.code === 200) {
          this.principalName = response.data.principalName
          this.consentForm.client_id = response.data.clientId
          this.consentForm.state = response.data.state
          this.scopes = response.data.scopes
          this.checkScopes = response.data.scopes.map(data => data.scope)
          this.redirectUri = response.data.redirectUri
        } else if (response.code === 302) {
          location.href = response.data
        }
      }).catch(() => {

      })
    }
  }
}
</script>
其他详细代码可以通过文末链接获取。
构建授权服务器
引入相关Maven依赖
<dependencies>
    <dependency>
        <groupId>org.springframework.boot</groupId>
        <artifactId>spring-boot-starter-security</artifactId>
        <version>3.0.5</version>
    </dependency>

    <dependency>
        <groupId>org.springframework.security</groupId>
        <artifactId>spring-security-oauth2-authorization-server</artifactId>
        <version>1.0.1</version>
    </dependency>

    <dependency>
        <groupId>org.springframework.boot</groupId>
        <artifactId>spring-boot-starter-web</artifactId>
        <version>3.0.5</version>
    </dependency>
</dependencies>
授权服务配置
创建AuthorizationServerConfig授权服务配置类,定义一系列相关Bean。
首先定义授权同意页面地址CUSTOM_CONSENT_PAGE_URI常量,指定为前端授权同意页面地址。在启用授权同意功能并且用户之前没有对客户端授权的情况下将重定向到授权同意页面。
private static final String = "http://localhost:9528/dev-api/oauth2/consent";
下面是授权服务相关配置,在整个示例中我们将使用OIDC认证流程完成。以下配置中值得注意的是:
- 自定义UserInfoMapper,在OIDC认证中,用于返回给客户端用户信息,实际工作中你可以从数据存储中加载。
- 在定义授权同意页面URI的同时,还自定义了authorizationResponseHandler和errorResponseHandler,主要是将Handler改为以json形式返还成功或错误信息。
- 在授权配置中我们额外增加了
BearerTokenAuthenticationFilter用于处理token认证信息。
@Bean
@Order(Ordered.HIGHEST_PRECEDENCE)
public SecurityFilterChain authorizationServerSecurityFilterChain(HttpSecurity http,
                                                                  JwtDecoder jwtDecoder,
                                                                  OidcUserInfoService userInfoService) throws Exception {
    OAuth2AuthorizationServerConfigurer authorizationServerConfigurer =
            new OAuth2AuthorizationServerConfigurer();

    //Custom User Mapper
    Function<OidcUserInfoAuthenticationContext, OidcUserInfo> userInfoMapper = (context) -> {
        OidcUserInfoAuthenticationToken authentication = context.getAuthentication();
        JwtAuthenticationToken principal = (JwtAuthenticationToken) authentication.getPrincipal();
        return userInfoService.loadUser(principal.getName(), context.getAccessToken().getScopes());
    };
    authorizationServerConfigurer.oidc((oidc) -> {
        oidc.userInfoEndpoint((userInfo) -> userInfo.userInfoMapper(userInfoMapper));
    });

    //define authorization consent page
    authorizationServerConfigurer.authorizationEndpoint(authorizationEndpoint ->
            authorizationEndpoint.consentPage(CUSTOM_CONSENT_PAGE_URI)
                    .authorizationResponseHandler(new OAuth2AuthorizationAuthenticationSuccessHandler())
                    .errorResponseHandler(new OAuth2AuthorizationAuthenticationFailureHandler()));

    RequestMatcher endpointsMatcher = authorizationServerConfigurer.getEndpointsMatcher();

    return http.securityMatcher(endpointsMatcher).authorizeHttpRequests((authorizeRequests) ->
            authorizeRequests.anyRequest().authenticated()
    ).csrf((csrf) -> {
        csrf.ignoringRequestMatchers(endpointsMatcher);
    }).apply(authorizationServerConfigurer)
            .and()
            .addFilterBefore(new BearerTokenAuthenticationFilter(
                    new ProviderManager(new JwtAuthenticationProvider(jwtDecoder))
            ), AbstractPreAuthenticatedProcessingFilter.class)
            .exceptionHandling(exceptions -> exceptions.
                    authenticationEntryPoint(new Http401UnauthorizedEntryPoint()))
            .apply(authorizationServerConfigurer)
            .and()
            .build();
}
注册一个客户端信息,OIDC认证中scope必须包含openid。requireAuthorizationConsent()设置为true表示需要授权同意。
@Bean
public RegisteredClientRepository registeredClientRepository() {
    RegisteredClient registeredClient = RegisteredClient.withId(UUID.randomUUID().toString())
            .clientId("relive-client")
            .clientSecret("{noop}relive-client")
            .clientAuthenticationMethods(s -> {
                s.add(ClientAuthenticationMethod.CLIENT_SECRET_POST);
                s.add(ClientAuthenticationMethod.CLIENT_SECRET_BASIC);
            })
            .authorizationGrantType(AuthorizationGrantType.AUTHORIZATION_CODE)
            .authorizationGrantType(AuthorizationGrantType.REFRESH_TOKEN)
            .redirectUri("http://127.0.0.1:8070/login/oauth2/code/messaging-client-oidc")
            .scope(OidcScopes.OPENID)
            .scope(OidcScopes.PROFILE)
            .scope(OidcScopes.EMAIL)
            .clientSettings(ClientSettings.builder()
                    .requireAuthorizationConsent(true)
                    .requireProofKey(false)
                    .build())
            .tokenSettings(TokenSettings.builder()
                    .accessTokenFormat(OAuth2TokenFormat.SELF_CONTAINED)
                    .idTokenSignatureAlgorithm(SignatureAlgorithm.RS256)
                    .accessTokenTimeToLive(Duration.ofSeconds(30 * 60))
                    .refreshTokenTimeToLive(Duration.ofSeconds(60 * 60))
                    .reuseRefreshTokens(true)
                    .build())
            .build();
    return new InMemoryRegisteredClientRepository(registeredClient);
}
授权同意页面接口
创建相应的Controller来处理前端发送请求,用于获取授权同意页面相关客户端信息。
@RestController
@RequiredArgsConstructor
@CrossOrigin
public class AuthorizationConsentController {
    private final RegisteredClientRepository registeredClientRepository;

    @GetMapping(value = "/oauth2/consent")
    public Map<String, Object> consent(Principal principal,
                                       @RequestParam(OAuth2ParameterNames.CLIENT_ID) String clientId,
                                       @RequestParam(OAuth2ParameterNames.SCOPE) String scope,
                                       @RequestParam(OAuth2ParameterNames.STATE) String state) {

        Set<String> scopesToApprove = new LinkedHashSet<>();
        RegisteredClient registeredClient = this.registeredClientRepository.findByClientId(clientId);
        Set<String> scopes = registeredClient.getScopes();
        for (String requestedScope : StringUtils.delimitedListToStringArray(scope, " ")) {
            if (scopes.contains(requestedScope)) {
                scopesToApprove.add(requestedScope);
            }
        }
        Map<String, Object> data = new HashMap<>();
        data.put("clientId", clientId);
        data.put("clientName", registeredClient.getClientName());
        data.put("state", state);
        data.put("scopes", withDescription(scopesToApprove));
        data.put("principalName", principal.getName());
        data.put("redirectUri", registeredClient.getRedirectUris().iterator().next());

        Map<String, Object> result = new HashMap<>();
        result.put("code", HttpServletResponse.SC_OK);
        result.put("data", data);
        return result;
    }

    private static Set<ScopeWithDescription> withDescription(Set<String> scopes) {
        Set<ScopeWithDescription> scopeWithDescriptions = new LinkedHashSet<>();
        for (String scope : scopes) {
            if (OidcScopes.OPENID.equals(scope)) {
                continue;
            }
            scopeWithDescriptions.add(new ScopeWithDescription(scope));

        }
        return scopeWithDescriptions;
    }

    public static class ScopeWithDescription {
        private static final String DEFAULT_DESCRIPTION = "We are unable to provide information about this permission";
        private static final Map<String, String> scopeDescriptions = new HashMap<>();

        static {
            scopeDescriptions.put(
                    "profile",
                    "Use your profile picture and nickname"
            );
            scopeDescriptions.put(
                    "email",
                    "Get your email"
            );
        }

        public final String scope;
        public final String description;
        public final boolean disabled;

        ScopeWithDescription(String scope) {
            this.scope = scope;
            this.description = scopeDescriptions.getOrDefault(scope, DEFAULT_DESCRIPTION);
            this.disabled = true;
        }
    }
}
用户认证配置
配置 Spring Security 已要求用户进行认证。配置formLogin登录,包括成功和失败的处理器。在这里,成功时使用了JwtAuthenticationSuccessHandler,返回JWT格式token。启用了 OAuth2 资源服务器,并指定了 JWT 作为令牌解析方式。同时,配置了一个简单的内存中用户,用于测试和演示。
请注意,实际生产环境中,您可能需要连接数据库或其他身份验证提供者,并且密码应该使用更安全的存储方式,而不是明文密码。
@EnableWebSecurity
@Configuration(proxyBeanMethods = false)
public class WebSecurityConfig {

    @Autowired
    JWKSource<SecurityContext> jwkSource;

    @Bean
    SecurityFilterChain defaultSecurityFilterChain(HttpSecurity http) throws Exception {
        http
                .authorizeHttpRequests(authorizeRequests ->
                        authorizeRequests.anyRequest().authenticated()
                )
                .formLogin().successHandler(new JwtAuthenticationSuccessHandler(jwkSource)).failureHandler(new AuthenticationEntryPointFailureHandler(new Http401UnauthorizedEntryPoint()))
                .and()
                .logout().logoutSuccessHandler(new Http200LogoutSuccessHandler())
                .and()
                .oauth2ResourceServer(OAuth2ResourceServerConfigurer::jwt)
                .sessionManagement().sessionCreationPolicy(SessionCreationPolicy.STATELESS)
                .and()
                .csrf().disable()
                .exceptionHandling().authenticationEntryPoint(new Http401UnauthorizedEntryPoint());
        return http.build();
    }

    @Bean
    UserDetailsService users() {
        UserDetails user = User.withUsername("admin")
                .password("{noop}111111")
                .roles("ADMIN")
                .build();
        return new InMemoryUserDetailsManager(user);
    }
}
构建 OAuth2 客户端
我们首先创建一个简单的 Spring Boot 项目。
引入相关Maven依赖
<dependencies>
    <dependency>
        <groupId>org.springframework.boot</groupId>
        <artifactId>spring-boot-starter-web</artifactId>
        <version>3.0.5</version>
    </dependency>

    <dependency>
        <groupId>org.springframework.boot</groupId>
        <artifactId>spring-boot-starter-oauth2-client</artifactId>
        <version>3.0.5</version>
    </dependency>

    <dependency>
        <groupId>io.netty</groupId>
        <artifactId>netty-all</artifactId>
        <version>4.1.90.Final</version>
    </dependency>
</dependencies>
配置 OAuth2 客户端
spring.security.oauth2.client.registration.messaging-client-oidc:配置了一个OAuth2客户端注册,具体属性如下:provider:指定了OAuth2服务提供者的名称,这里命名为client-provider。client-id:客户端标识,用于标识客户端向授权服务器请求令牌。client-secret:客户端密钥,用于客户端身份验证。authorization-grant-type:授权模式,这里使用授权码模式(authorization_code)。redirect-uri:回调地址,在用户授权后将用户重定向回客户端的地址。scope:请求的权限范围。client-name:客户端的名称。
spring.security.oauth2.client.provider.client-provider:配置OAuth2服务提供者的详细信息:authorization-uri:授权服务的授权地址。token-uri:用于获取访问令牌的地址。user-info-uri:用于获取用户信息的地址。jwk-set-uri:用于获取JSON Web Key Set(JWKS)的地址。user-info-authentication-method:用于获取用户信息的身份验证方法,这里是使用header。user-name-attribute:指定包含用户名称的属性。
server:
  port: 8070

spring:
  security:
    oauth2:
      client:
        registration:
          messaging-client-oidc:
            provider: client-provider
            client-id: relive-client
            client-secret: relive-client
            authorization-grant-type: authorization_code
            redirect-uri: "{baseUrl}/login/oauth2/code/{registrationId}"
            scope:
              - openid
              - profile
              - email
            client-name: messaging-client-oidc
        provider:
          client-provider:
            authorization-uri: http://localhost:9528/oauth2/authorize
            token-uri: http://localhost:9528/dev-api/oauth2/token
            user-info-uri: http://localhost:9528/dev-api/userinfo
            jwk-set-uri: http://localhost:9528/dev-api/oauth2/jwks
            user-info-authentication-method: header
            user-name-attribute: sub
配置 Spring Security OAuth2 登录功能。这个配置类的主要作用是启用 OAuth2 登录,并配置了一个内存中的用户,用于演示。
@Configuration(proxyBeanMethods = false)
public class OAuth2LoginConfig {

    @Bean
    SecurityFilterChain securityFilterChain(HttpSecurity http) throws Exception {
        http.authorizeHttpRequests()
                .anyRequest()
                .authenticated()
                .and()
                .formLogin(from -> {
                    from.defaultSuccessUrl("/home");
                })
                .oauth2Login(Customizer.withDefaults())
                .csrf().disable();
        return http.build();
    }

    @Bean
    UserDetailsService users() {
        UserDetails user = User.withUsername("admin")
                .password("{noop}password")
                .roles("USER")
                .build();
        return new InMemoryUserDetailsManager(user);
    }

    @Bean
    PasswordEncoder passwordEncoder() {
        return PasswordEncoderFactories.createDelegatingPasswordEncoder();
    }
}
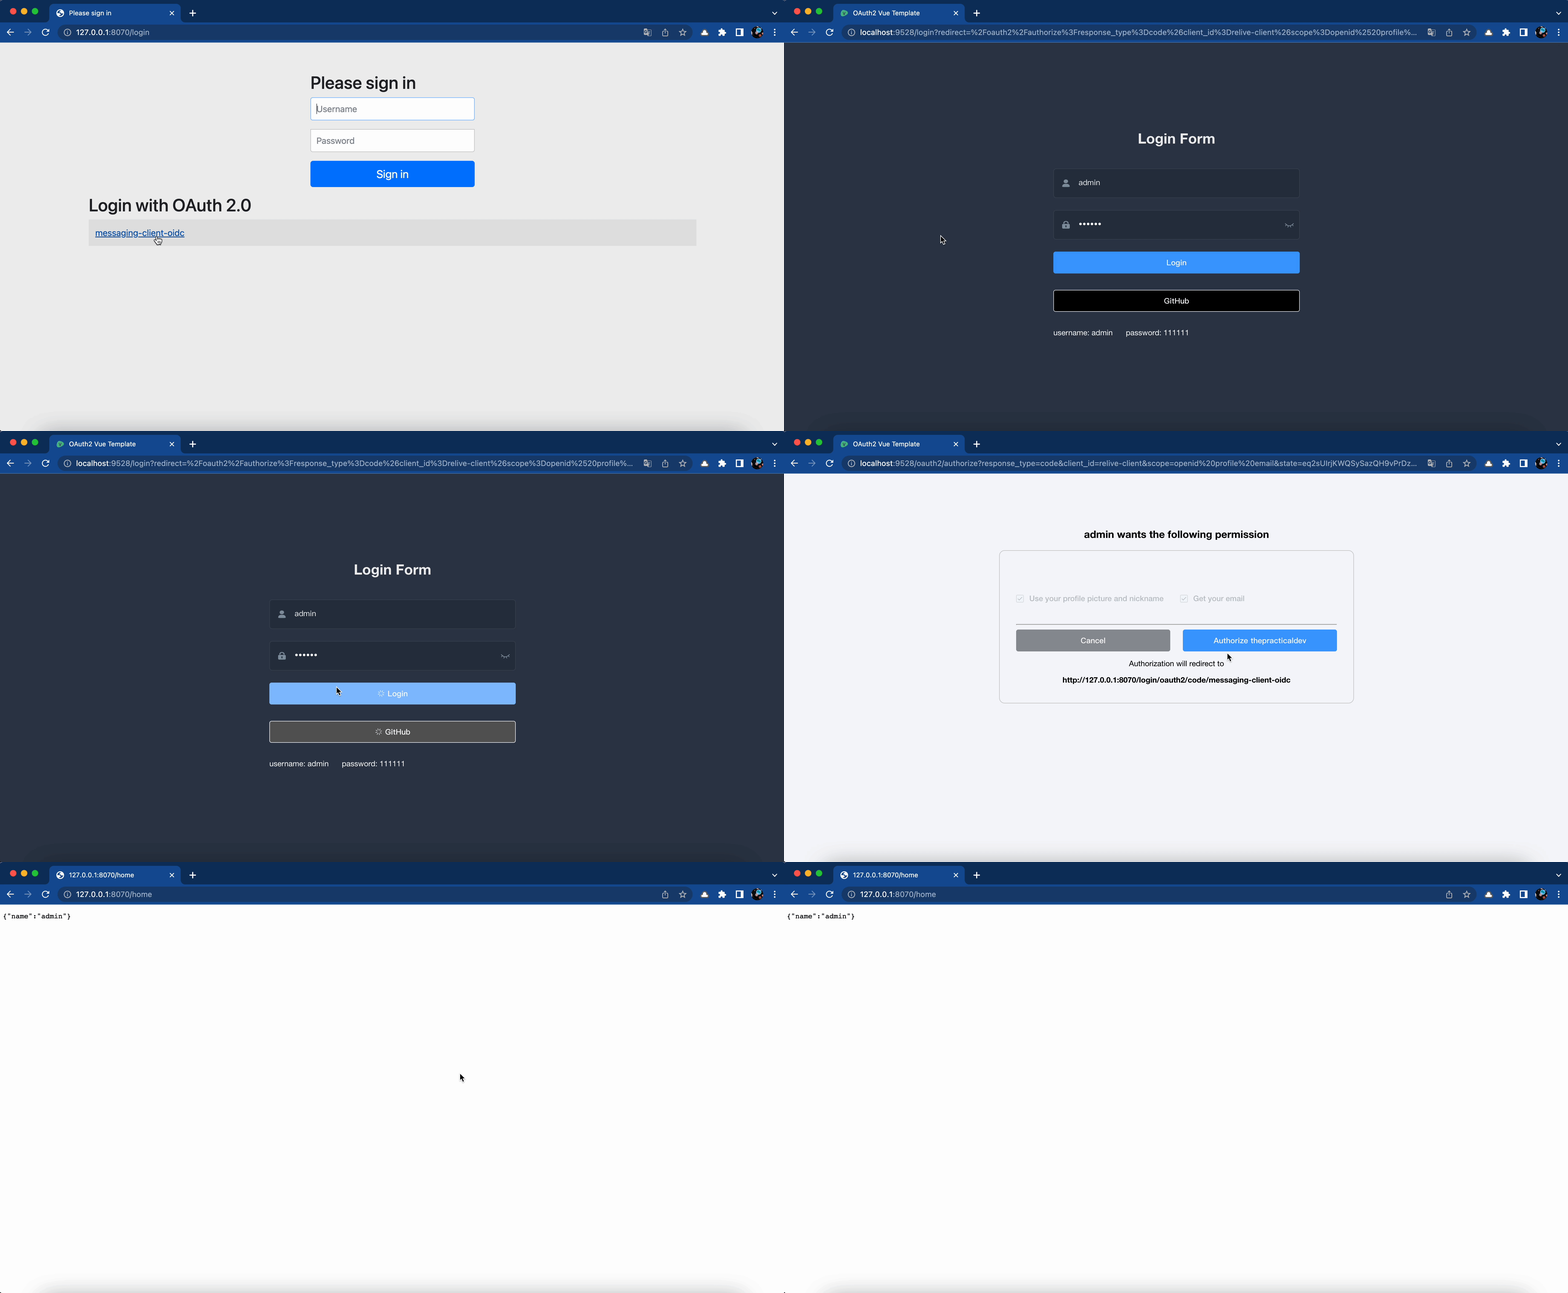
演示

结论
通过整个示例,我们了解了OAuth2授权的基本原理,前端如何与后端进行交互,以及如何在授权流程中构建自定义的授权同意页面。在实际应用中,这种前后端分离的授权流程使得系统更加灵活,同时通过Vue.js构建页面提供了更好的用户体验。
与往常一样,本文中使用的源代码可在 GitHub 上获得。